|
|
||||||||||||||||||||||||||
 |
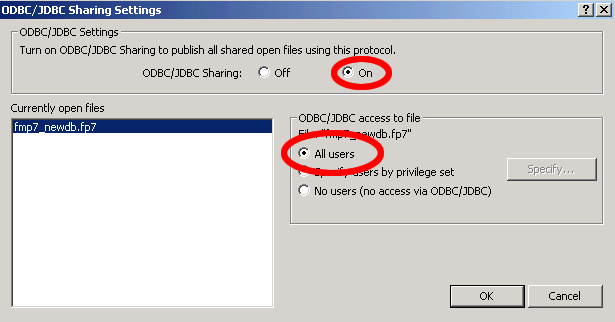 |
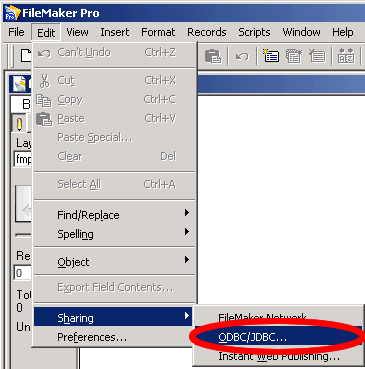
[Figure 2 - Enabling FileMaker 7 ODBC/JDBC Sharing]
Open the Windows Data Sources (ODBC) Control Panel to
create a new FileMaker 7 System DSN. Click the System DSN tab, then
click the Add button.
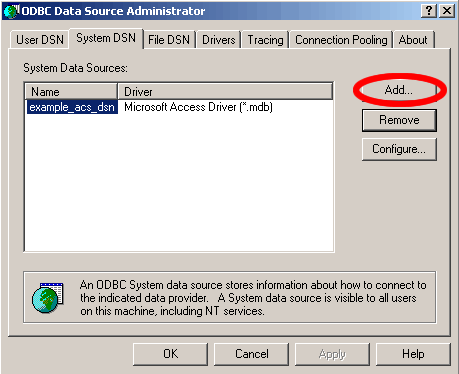
[Figure 3 - Create New FileMaker 7 DataSource]
Select DataDirect 32Bit SequeLink 5.4 as the driver for
the new FileMaker 7 data source, then click the Finish button.
Note: Do not select FileMaker Pro as the driver, because the
FileMaker Pro driver is only used for the older versions of the FileMaker
database.
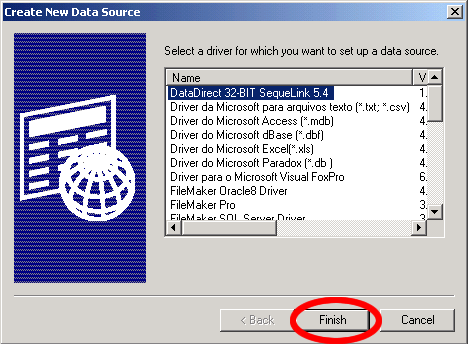
[Figure 4 - Select DataDirect 32Bit SequeLink 5.4 Driver]
Enter the name of the ODBC DSN in the first field. Fill
in the SequeLink Server Host (127.0.0.1), and SequeLink Server Port
(2399) fields as shown in the image below.
Note: The operational features of the FileMaker 7 ODBC Driver
are very different from previously shipped FileMaker ODBC drivers. The
DataDirect SequeLink FileMaker driver included with FileMaker Pro 7
only permits ODBC connections to be made to a local FileMaker 7 database
running on the same computer. This is why the SequeLink Server Host
field must be filled in with the TCP/IP address of 127.0.0.1 or the
hostname "localhost". The feature of allowing external computers
to make an ODBC connection to a FileMaker 7 database is reserved for
the FileMaker Server 7 Advanced product.
Click the “...” button to the right of the Server Data Source
field, then select the name of the new FileMaker 7 database (fmp7_newdb).
Click the Ok button.
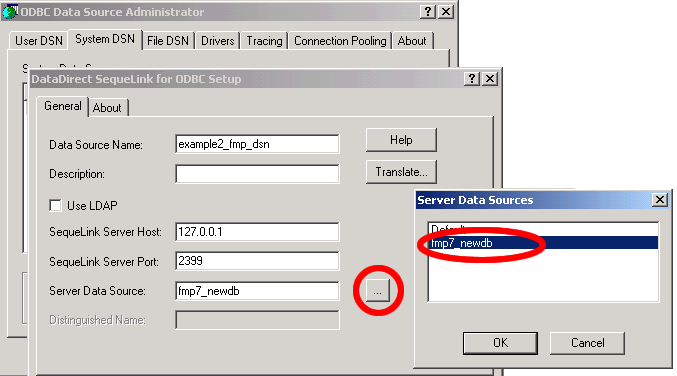
[Figure 5 - Enter SequeLink Driver Parameters for FileMaker 7]
In order to verify that a connection can be made to the FileMaker 7 database, it is a good idea to test the ODBC connection before attempting to use the new ODBC DSN. DataDirect has provided a helpful Test Connect button within their driver setup window which will enable testing of ODBC database connectivity.
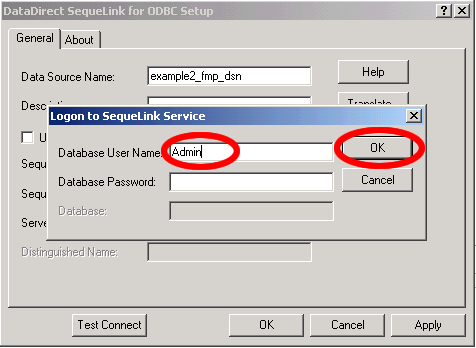
Click the Test Connect button shown in Figure 15 to verify
that a connection can be made to the new FileMaker 7 database.
Enter Admin as the username, with no password, then click the Ok button.
Click the Ok button to close the test results dialog box.
Note: If the connection test fails, verify that ODBC/JDBC sharing
is turned on and that an older version of FileMaker is not running with
the Local or Remote Data Access Companion plug-ins enabled.
 |
 |
[Figure 6 - Test FileMaker 7 ODBC DSN]
![]()
![]()